|
| 
|
About eRocket
eRocket is a
PC-based application that mimics Rocket eBook™, a portable eBook reading device.
It allows you to test drive the Rocket eBook and read electronic, publicly
available books and papers (called RocketEditions™), on your PC, as well as read
and share titles that you create yourself.
eRocket, from NuvoMediaŸ, Inc, is presented free to show you the ease of
reading electronic-literary works, and to demonstrate the features of the
acclaimed Rocket eBook. eRocket emulates everything that a Rocket eBook does,
except that you cannot read purchased RocketEditions with it. Purchased
RocketEditions are encrypted for the particular Rocket eBook for which they were
purchased.
From Rocket-Library.com, a Rocket eBook community Web site, you can download
and read unencrypted RocketEditions on your eRocket, or use RocketWriter™ as an
authoring tool to create your own RocketEditions.
To give your eRocket a different appearance, you can change its border’s
appearance or "skin." Several skins are included, as well as instructions how to
download skins from our Web site or how to make your own.
New Features with this Release
» Updated with RocketEngine, version 1.3
Page Navigation
Typically, when you read a printed book, you move forward, reading one page
at a time. Getting around a book on eRocket is easier. Located on the spine of
the eRocket are Page Forward and Page Backward buttons to "flip" pages one way
or the other. Mouse click one of the buttons to move your text. On your PC
keyboard, the Page Up and Page Down keys will also move the pages.
There may be times when you want to move through a book quickly, jumping from
chapter to topic rather than paging along. Your eRocket allows you to move
quickly to a specific location by using the Page-Navigation Bar.
Page-Navigation Bar
With its Page-Navigation Bar, eRocket gives you a visual
indication that shows you where you are in a document. It’s the thin bar on
the right edge of the text screen. Serving as a gauge, the whole bar
represents an entire RocketEdition, and the darker part shows where you are
within the full text. You can use the Page-Navigation Bar just like you use
the thickness of a book--to open to an approximate location.
You can also use the Page-Navigation Bar to identify specific locations
in the text, just as you use page numbers with a conventional book.
To move around text quickly using the Page-navigation Bar:
1. Click anywhere along the thin Page-navigation Bar. At the
bottom of the screen, an instruction banner with two location buttons
appears.
Go To page - The location corresponding to the place you
clicked.
Current page - The number of your current page.
Note: If the instruction banner covers text you want to
read, click the arrow on the banner to move it to the opposite edge of
the page.
2. Drag your mouse cursor up and down along the bar. The page
number in the Go To box changes.
3. When the page number is what you want, click the Go To
button. Your eRocket displays the text at the page you selected.
Page numbers are generated automatically, and their total depends on
page orientation and selected font size. The default, small-font size is
10, while 14 points is the large size. Both are the Verdana font style.
eRocket Menus
eRocket has two menus:
Menu One that contains eRocket functions, and
Menu Two that contains links to Internet Web sites and links for
sending email to NuvoMedia, Inc. with suggestions, and to your friends.
On the default skin, the menus are activated by clicking on either Rocket
eBook (Menu One) or NuvoMedia (Menu Two) markings. On other skins the menus are
activated by clicking on different parts of the skin. Usually these areas are
indicated by some sort of graphic on the skin. To see where all the clickable
areas are on a skin, click the secondary-mouse button on the skin. As long as
you hold down the button, the clickable areas will highlight.
Note: There are some features that are active in eRocket that are
only simulations of the Rocket eBook, such as Stylus Calibration, Charging, and
Text-rotation. We mimic these aspects of the Rocket eBook to give you an
understanding of its capabilities. For example, in the Rocket eBook, if there is
no activity for a period of ten minutes, the Rocket eBook shuts off to conserve
its battery charge. So, with eRocket, you will see a feigned sleep mode, which
displays a roaming Charging window (to simulate when the Rocket eBook is
recharging its battery). To get out of this demonstration mode, just mouse-click
your eRocket.
Menu One (F11)
When the eRocket application first launches, it displays with the frame
appearance, or "skin," of the Rocket eBook.
Import RocketEdition... - This loads a RocketEdition for
reading. You may also load a RocketEdition into eRocket by dragging and
dropping a RocketEdition <name>.rb file onto your eRocket window
or icon.
Rotate Window - This rotates (toggles) the orientation of the
eRocket window (skin) independently of the text. The two rotational
positions are: Landscape (horizontal) and Portrait (vertical).
The text can also rotate independently of the skin.
Disable Buy Now Window - If unchecked, a clickable window
displays, which when clicked takes you to a Web site where you can buy a
Rocket eBook. If checked, it prevents the Buy Now Window from
displaying. Selecting Disable Buy Now Window menu selection toggles the
function, and a checkmark appears in Menu One.
Minimize - Minimizes (reduces) the eRocket window so that it
is out of your way but still available as a Microsoft Windows Taskbar
button.
Load Skin... - eRocket is shipped with several different
skins. You can choose another skin to change the look of eRocket, or you
can create your own. To customize your own skin, please read eRocket
Skins.
Next Skin - This displays the next skin.
Default Skin - This restores the default skin. When eRocket
first launches, it displays the appearance or "skin" of the Rocket eBook
as a default.
Exit - This closes the eRocket application.
Notes: Press Alt+Space bar on your PC keyboard to activate
the standard Windows System menu. Alt+F4 (Alt+function key 4) will close
eRocket.
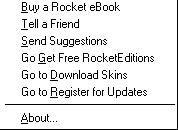
Menu Two (F12)
Click the NuvoMedia text that appears in the border of the default skin
and a menu displays with the following options:
Note:You must be connected to the Internet for the following
functions to work.
Buy a Rocket eBook - Selecting this button links your PC Web
browser to the Rocket eBook Internet site so that you can learn more
about the Rocket eBook and how to buy one.
Tell a Friend - This menu item launches your email application
and automatically inserts a message and the Web address at which your
friend can download eRocket. You control the sending.
Send Suggestions - Select this menu item if you want to send
NuvoMedia an email with your suggestions.
Go to Download Skins - This menu item will link your PC
browser to a Web site where different skins are available free for
downloading and use.
Register for Updates - By registering your eRocket
application, you will receive notification of updated software and the
Rocket eNewsletter.
About - This menu item includes the software version,
copyright information, and the name of the person who created the skin
that you are currently using.
Finding the Menus
Menus can be anywhere on a downloaded skin; there is no standard place for
them. If you can not find menu buttons on a skin, press the F11 key on your PC
keyboard to highlight the eRocket functions (Menu One), or the F12 key to
highlight the email and Web-link functions (Menu Two). Use your mouse secondary
button to click eRocket and highlight all of the clickable areas.
eRocket Icons
The two eRocket menus, two page buttons, and four screen controls activate
when you mouse-click them. Click a single icon to display its menu. Click it
again to dismiss it.
Note: The Rocket eBook, with its touchscreen, activates menus or
functions when the icons are tapped with the stylus or fingernail tip.
Shortcut (Rocket) Icon (F6) 
The Shortcut icon lets you set (assign) a shortcut to one of the options
from the Bookshelf or Book menus, or to Page Forward or Page Back. Once set,
a rocket icon appears in the menu to indicate which item will be selected
when you click the Shortcut icon.
When you first use your eRocket, the Shortcut icon is programmed to
change the screen-font size from small to large or vice versa. You can
reassign the Shortcut icon to any other selection that appears in the Book
or Bookshelf menu.
To assign the Shortcut icon:
1. Click the menu item that contains the function you want to
assign to the shortcut icon.
2. Click the Shortcut icon. The screen displays the Assigning
Shortcut window and tells you to click a menu item.
3. Click the function you want the Shortcut icon to perform. A
rocket icon appears in the menu next to the function you selected.
4. Close the menu by again clicking the icon you opened.
The next time you click the Shortcut (rocket) icon, it performs the
function you assigned.
Page-Rotate Icon and Screen Calibration (F5) 
The Page-Rotate icon lets you change the orientation of the text in the
screen. Click on the Rotate-Text icon and, using one of the four directional
arrows, click a dark arrow that points in the direction you want the text to
display. (The white arrow points to the current direction.) The eRocket and
text rotates to the selected orientation.
Calibrating the Screen(F5)
On eRocket, the Page-Rotate icon also simulates the calibration of the
screen on the Rocket eBook, using target bull's-eyes. Calibration ensures
that when you click the screen where there's an icon, menu, or button, it
has a click-sensitive area below that image. This process is common to
personal-data devices. If you want to, click each bull's-eye that appears to
understand how to recalibrate the Rocket eBook screen. This feature is not
actually needed for the eRocket; it is a simulation of how the Rocket eBook
functions.
Book Icon(F7) 
The Book icon presents things you might want to do while reading a
RocketEdition. For instance, you can annotate your RocketEdition by making
notes, you can set bookmarks, or you can underline text.
You can also search for specific text or look up words in the preloaded
dictionary. Click once on the icon to open the menu and click again to close
the menu.
Lookup - Look up word definitions by clicking on Lookup. Then
click the word you would like to have defined. If found, the definition
displays in a pop-up window. Click New Word to look up another word or click
Done if you are finished.
Note: The dictionary lookup feature will not display if there
is no dictionary loaded into eRocket, and the Dictionary menu selection will
be grayed. Contact NuvoMedia at eRocket@NuvoMedia.com if
you do not have a copy of the dictionary and would like one, or download the
version of eRocket with the pre-loaded dictionary. (Note: A larger
dictionary is available for the Rocket eBook.)
Underline - To underline text in the RocketEdition, just click the
Underline menu item (under the Book icon). Then, using your mouse cursor,
drag along the text you want to underline. A dotted underline appears under
the selected text. To remove the underline, drag your pointer over the text
from which you want the underline deleted. To close the underline feature,
click Done.
Add Note - To annotate a RocketEdition, select the Add Note
feature. A keyboard appears. You can click on the screen keyboard characters
or use your PC keyboard. Or with your mouse, you can use the Allegro™
feature. With a RocketEdition open, click the Book icon and then click on
Add Note.
Allegro Feature
Click the Keyboard/Allegro button so that the word "Allegro" appears.
(The Keyboard/Allegro button toggles between the two add-a-note
functions.) Select an appropriate radio button to designate your
character's category: alphabetical, numeric, etc. Using your mouse
cursor, click and drag to form characters. Click Attach when you have
finished your note, and then click on your RocketEdition where you want
your note attached. A solid triangle appears.
To open the note after attachment, click the triangle, and the note
reappears. To edit, move, or remove the note, click on it's triangle and
click on the appropriate button."
Once the note is entered, the note must be attached somewhere on the
text of the RocketEdition. Click on Attach and then click on a word with
the mouse pointer to attach the note. A small triangle pointing downward
appears. Notes can be deleted or edited.
Set Bookmark - Bookmarks can be set throughout a RocketEdition. To
set a bookmark, select the Bookmark menu item (from the Bookshelf icon).
After you activate the feature, select the text where you want the bookmark
inserted. A right-facing triangle indicates a bookmark. The bookmark is
automatically named using the first line of the paragraph.
To edit a bookmark, click on the triangle, select the name of the
bookmark, click Rename or Delete.
If you have set any bookmarks, a bookmark list displays when you click
the Book icon. To go to a different bookmark, select the bookmark
available and then click on GoTo. When you are done, click Done.
Go To - The GoTo menu has two selection, Find and First Page. To
go to the first page of a RocketEdition, click Go To and then select First
Page.
Find Feature
To find text within a RocketEdition:
1. Click Find and a keyboard appears. You can mouse-click the
first few characters or you can use your PC keyboard. The onscreen
keyboard appears. Enter the text you are searching for, and select the
type of text by clicking the appropriate radio button. The text is
searched in one direction from the current location.
2. Then click Forward or Backward.
To close the menu window, click Done.
To close the Bookshelf menu, click on the icon again. The arrows
on the right side of the Bookshelf menu window can be used to scroll the
RocketEditions.
Find will find specific text, an underlined word or passage, a note, or a
bookmark within the active RocketEdition. You can also take advantage of the
Allegro feature to find items.
Previous Location - Selecting this item takes you back to your
previous location in the document.
About this Title - Displays information about the RocketEdition
that is open. It also offers a choice to remove the markups from the
RocketEdition.
Bookshelf Icon (F8) 
The Bookshelf icon shows the RocketEditions that are loaded into your
eRocket and the settings for the eRocket itself. The menu is divided into
three sections.
Top section - A listing of the four, most-recently viewed
RocketEditions with the last-opened title is at the top of the menu. Click a
RocketEdition title to open it.
Mid section, the Bookshelf - Click on the Bookshelf section
to display the entire list of RocketEditions that you loaded on your
eRocket. Click to highlight a particular RocketEdition and then click Open.
To delete a RocketEdition, click on the title and then click Delete. A
confirmation window appears. Click Yes to delete it.
Lower Section - Settings - Click on Settings to
change the font size from large to small or vice versa. The simulated
eRocket backlight is also controlled by this menu. The default backlight
setting is 60%.
About Rocket eBook - This selection presents information regarding
the Rocket eBook.
Note: RocketEditions always reopen to the last page that
was read. If a title has never been opened, it opens to the first page.
There is no need to close a RocketEdition; just select a new RocketEdition
or exit.
Viewing and Panning Images
If an illustration or diagram is larger than the screen, you can still view
the entire image.
Arrows appear along the edges of the image that continue past the edge of the
screen. You can click the arrows to scroll to the hidden portion of the image.
Or, you can simply touch the image anywhere and drag on the screen. When you are
done viewing, use the Page Backward or Page Forward buttons to continue reading.
Keyboard Shortcuts
The keys on your PC and their eRocket functions are:
PgUp - Page-backward button
PgDn - Page-forward button
F5 - Page-Rotate icon and Screen Calibration
F6 - Rocket icon
F7 - Book icon
F8 - Bookshelf icon
F11 - Opens Menu One
F12 - Opens Menu Two
Alt+Space - Opens Windows System menu
Alt+F4 - Closes eRocket
Free RocketEditions
You can choose from thousands of free RocketEditions and download them to
your eRocket.
Get (download) RocketEditions
1. From Menu Two (NuvoMedia button on the default skin), select Go
Get Free RocketEditions.
2. Choose any RocketEdition you like from the library, and
download it to your PC. Download as many as you like. The RocketEdition
automatically loads into eRocket unless you have RocketLibrarian installed.
If you have RocketLibrarian installed, downloaded RocketEditions load into
RocketLibrarian.
Import RocketEditions to eRocket
There are two ways to import a RocketEdition into an eRocket:
Use the Import RocketEdition... command or Drag and Drop the
RocketEdition.
To import a RocketEdition that has been saved on your hard drive:
1. Select Import RocketEdition... from Menu One. An Open
Dialog box appears.
2. Select the RocketEdition you want to import.
3. Click Open.
As a second way to import, you can drag and drop a RocketEdition onto eRocket
to import it. From your Microsoft Windows Explorer or from the RocketLibrarian,
select the RocketEdition you want to import and drag it onto the eRocket.
Buy a Rocket eBook
To read electronic titles purchased from participationg RocketEdition
Booksellers, you must first have the Rocket eBook. Click on eRocket's Menu
Two and select the "Buy a Rocket eBook" link (you must be connected to the
Internet for this link to work).
eRocket Skins
Another fun feature of the eRocket is that you can change the "skin"
appearance of your eRocket.
About Skins
What’s a "skin?" Skins are various graphical-user-interface (GUI) windows
that can be applied to and used with eRocket. Skins allow you to change the
appearance of your eRocket frame. They do not change the functionality of your
eRocket.
The default skin is one that looks like an actual Rocket eBook. But, as we
said, you can select another (preloaded), download others, or even make your
own. Here's how to make your own.
Creating Your Own Skin for Your eRocket
Creating a new skin for the eRocket is simple. Find an image that you want to
use or "paint" one. Use a favorite photograph. But, whatever you do, when done,
it must be an 8-bit bitmap file, which is identified with the file extension, .bmp.
And, for a skin to work, it needs an ASCII (.txt) description of the
file. With that, the image and description have to be zipped (compressed). The .zip
file then has to be renamed as a skin file using the extension .skn.
Imagine reading on the image of a toaster, or on a 1950s television. It's fun.
To create a Rocket eBook skin, you need:
» A Zip program, such as WinZip™, 123 Zip™, or NetZipý
» A text-editor program, such as Windows Notepad™
» A graphics-paint program, such as Adobe Photoshop™, Paint Shop
Pro™, Kodak Imaging for Windows™, or MSPaint™.
» An 8-bit, bitmap (*.bmp) image file (existing or create
your own, if you have a graphics program). The image may be any size, but
you must leave room for the area where eRocket will display text. This area
must be defined with a fixed size of 480 X 320 pixels, and be in the
landscape orientation, i.e., with the widest dimension positioned
horizontally. The image must also have visual markers for two eRocket menus
(Menu One and Two), and six Rocket eBook feature areas.
Required Skin Buttons
Two eRocket menus (clickable areas) are needed to control eRocket functions:
» Menu One
» Menu Two
Six feature areas (clickable markers) are needed to operate eRocket:
» Rotate-Text Icon
» Rocket Shortcut Icon
» Book Icon
» Bookshelf Icon
» Page Backward
» Page Forward
A description of your skin is also necessary, which must describe where the
clickable areas are located, as well as the location of other eRocket commands.
So, you need to create a *.info file for your skin. You can use Microsoft
Notepad or other text-based editor to write it. So, let’s get started. Here's a
template.
Create visual markers on your skin image:
1. Build an *.info file that includes:
NAME Template # Skin name
AUTHOR Your Name # The author's name
TRANSPARENT 255 0 0 # RGB of the transparent pixels in the bitmap
FOREGROUND 0 0 0 # RGB of the foreground color
BACKGROUND 255 255 255 # RGB of the foreground color
ORIGIN 167 80 # the upper left corner (X Y) of the lcd # rectangles are
x1 y1 x2 y2 # the upper left and lower right corners
# menus
RECT MENU1 99 13 209 32 # rectangle for Menu One
RECT MENU2 636 15 714 31 # rectangle for Menu Two
# buttons
RECT BACK 314 486 398 519 # rectangle for back button
RECT FORWARD 416 485 500 519 # rectangle for forward button
# icons
RECT ROTATE 117 120 152 159 # the rotate icon
RECT ROCKET 117 323 152 363 # the rocket icon
RECT SHELF 659 125 694 159 # the bookshelf icon
RECT BOOK 659 324 694 363 # the book icon
RECT URL 404 64 80 498 http://www.rocket-ebook.com
Skin-Command Definitions
Name - Name of your newly created skin
Author - Your name, the person who created the skin
Transparent - RGB value of the pixels that you would like to
make transparent. For example, if you take a picture of an item on a red
background. You would need to make the red transparent, so only the item
would show on the screen.
Foreground - RGB value of the screen text color
Background - RGB value of the screen color on your skin. You
should have created an area that resembles a LCD on your skin. This area
must be exactly 480 x 320 pixels.
Origin - Pixel coordinates where the upper-left corner of the
LCD will be placed.
The menu and button commands require two sets of pixel coordinates.
These two sets define a clickable rectangle around the icon or text on
your skin. The first set of coordinates is the upper-left corner and the
second set is the bottom-right corner.
Rect Menu1 - Coordinates for Menu One (default Rocket eBook)
Rect Menu2 - Coordinates for Menu One (default NuvoMedia)
Rect Backward - Coordinates for page-backward button
Rect Forward - Coordinates for page-forward button
Rect Rotate - Coordinates for Rotate Icon
Rect Rocket - Coordinates for Rocket Icon
Rect Shelf - Coordinates for Book Shelf Icon
Rect Book - Coordinates for Book Icon
Rect URL – Web address for URL button coordinates (Use no
#comments.)
2. Save your info file as a text file. Make sure that the
extension is .info. Most text editors use the .txt as the
default extension, so make sure you specify (type over) the .txt
extension with ".info" when saving the file.
3. Zip the image and .info files into one single file. You
can use a program like WinZip™, 123 Zip™, or NetZip™.
4. Once you have created the Zip file, change the extension from .zip
to .skn.
5. Now load the .skn file into eRocket by:
a. Opening eRocket
b. Selecting Menu One
c. Choosing Load Skin and the skin you want to load
d. Clicking Open
Note: You can change the .skn extension of a
supplied- or downloaded-skin file to that of a .zip to examine and
re-engineer the skin.
Glossary
.info (extension) file – The file extension that is needed for an
information file when creating a skin, which you change from text (.txt)
to .info once it is complete.
.rb (extension) file – A RocketEdition file.
.skn (extension) file – The file extension that identifies a skin-file
type. A compressed (zipped) file that contains an image file and a .info file,
which will display a skin on eRocket.
Book Icon – Clicking the Book icon presents functions that apply to
the RocketEdition that is open, such as looking up words in a dictionary,
annotating, and going to a particular spot in the RocketEdition.
Bookshelf Icon – Clicking the Bookshelf icon reveals the four,
last-opened RocketEditions; access to all the loaded RocketEditions; and
Settings, such as simulated Backlight and Font size.
Drag and Drop – The process of clicking a file, holding down the mouse
button, and dragging the file to drop it (release the mouse button) on another
file or active application.
Encrypted – The state of being encoded or
scrambled; the act or state of converting a RocketEdition into encoded data that
can not be read except on a Rocket eBook. All RocketEditions purchased from
RocketEdition Booksellers are encrypted.
eRocket Skin – The graphic, desktop-window frame of the eRocket.
eRocket skins can be created or downloaded and changed to suit your fancy.
eRocket – A PC-based application that mimics and demonstrates a
portable Rocket eBook reader.
Menu One – An eRocket menu that has selections in a drop-down menu
that pertain to the eRocket.
Menu Two – An eRocket menu where links to useful Web sites and email
can be found.
Page Backward – To move text backward by a screen’s worth; a button on
the eRocket that, when clicked, will move the text and illustrations backward.
On the Rocket eBook, it is an actual button on the case.
Page Forward – To move text forward by a screen’s worth; a button on
the eRocket that, when clicked, will move the text and illustrations forward. On
the Rocket eBook, it is an actual button on the side of the case.
Rocket eBook – The hand-held, portable device that stores and displays
RocketEditions (electronic books) for reading.
RocketEdition– An electronic (file) edition of a published work; a
book, for example, a format that can be downloaded and read on your eRocket or
Rocket eBook.
RocketEdition Bookseller – A business with a Web site that sells
RocketEditions, such as Barnes and Noble.
RocketLibrarian – Accompanying NuvoMedia software that keeps track of
the RocketEdition titles you have downloaded and helps you transfer to them to
your eRocket or Rocket eBook; a virtual bookshelf on your computer. It can also
configure your Rocket eBook and eRocket settings.
Rocket-Library.com – A community Web site where you can download
additional RocketEditions for your eRocket or Rocket eBook, or upload and share
your documents with other readers.
Rocket Publisher – A book publisher or person who publishes
RocketEdition titles and sells them through Booksellers.
RocketWriter – The PC-software utility, included with RocketLibrarian,
that allows you to convert HTML, text, or ASCII files into RocketEditions.
RocketEditions created with RocketWriter are unencrypted.
Rotate – To rotate text within the screen.
Title – A synonym for RocketEdition; a book, document, paper, or
literary work title.
Unencrypted – Being unscrambled; the state
of a RocketEdition that can be read with eRocket or on a Rocket eBook.
|


 Home
Home